Quickstart
Quibbler allows easily creating highly interactive and efficient data analysis applications. Importantly, in Quibbler, efficiency and interactivity are enabled naturally, using completely standard Python, NumPy and Matplotlib programming syntax. There is thereby very little to learn to get started.
This page provides a minimal-demo quickstart to quickly get you up and running.
For additional demos, consider also the Examples.
For a more methodological tour, see the Introduction to Quibbler and the complete User Guide.
Setting up
Install
Before starting, please first install Quibbler.
Import
Quibbler for python, pyquibbler, is conventionally imported as
qb. In addition, it is convenient to specifically import some
often-used functions such as iquib (which will be explained below).
Following import, we execute qb.initialize_quibbler(), which
initializes Quibbler and configures NumPy and Matplotlib functions
to work with Quibbler. A typical import therefore looks as follows:
# Quibbler import:
import pyquibbler as qb
from pyquibbler import iquib
qb.initialize_quibbler()

# Other imports:
import numpy as np
import matplotlib.pyplot as plt
Graphics backend
pyquibbler works well with the tk backend. In PyCharm, specify
matplotlib.use("TkAgg"). In Jupyter Lab, specify:
%matplotlib tk
Example of a minimal app
As a simple example, we will build towards a simple data analysis app for cutting a square sub-image from a source image with a specified width around a chosen x-y point.
Writing such a code classically will require the use of callback functions to implement user interactions. In Quibbler, in contrast, we just need to define our parameters and plot them; the resulting graphics is automatically interactive.
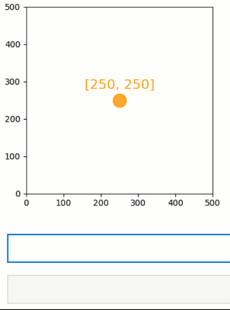
Let’s start with a code for interactively choosing our x-y point:
# Figure setup
plt.figure(figsize=(4, 5))
plt.axis('square')
plt.axis([0, 500, 0, 500]);
# Plot a "live" marker and text at defined xy-coordinates:
xy = iquib([250, 250])
x, y = xy
plt.plot(x, y, 'o', color='Orange', markersize=16)
plt.text(x, y + 30, xy, color='Orange', fontsize=16, ha='center');
As we can see, except for the use of the function iquib()
(explained below), the rest is a completely standard Python code for
plotting a marker at position x=250, y=250 and adding next to it a text
label specifying these coordinates. Indeed, running this code plots the
marker and the text as classically expected. Yet, unlike in classical
programming, in Quibbler the data items and graphics are all
bi-directionally linked. First, assigning new values to an upstream
variable, say assigning xy[0] = 100, immediately refreshes all
downstream graphics (the marker and the text move and the text label
refreshes). Second, the plotted marker is in fact draggable and, as we
drag it, we see that it leads to changes in the upstream variable xy
and in any dependent graphics, such as the text label and location.
In Quibbler, thereby, we can easily get interactive functionality while using completely standard programming syntax and without the need for the tedious programming of event-specific callback functions for implementing each interactive behavior.
How does it work?
Below, we briefly explain the above example, while providing a more general view of Quibbler functionality. You can also skip this section and continue with building our image-cutting example app below.
The quib object
Quibbler functionality is based on the Quib object. The quib is an
object that represents an output value as well as the function and
arguments used to calculate this value. There are two major types of
quibs: input quibs (i-quibs) which take a regular Python object as
their argument and present it as their value, and function quibs
(f-quibs) that calculate their output value by applying a given function
to a given list of arguments, which could include other quibs and any
other Python objects.
Input-quibs
Input-quibs are created using the function iquib(), which
transforms any regular Python object into a quib. In our case,
xy = iquib([250, 250]) creates an i-quib xy whose value is the
list [250, 250].
Function-quibs
Function-quibs are created naturally whenever we use quibs as part of
standard expressions, functions or statements. Indeed, Quibbler
modifies standard functions and operators such that they can work
directly with quibs. Such Quibbler-supported functions, also called
quiby functions, include not only many standard Python, NumPy and
Matplotlib functions (see List of quiby functions), but also
operators (such as +, -, <, >, **, @, etc.), and
any indexing syntax (e.g., if xy is a quib, xy[0] is a function
quib, whose function is to get the 0’th item from xq). We can
therefore easily define a chained network of function quibs using
standard programming syntax.
In our case, x, y = xy creates the f-quibs x = xy[0] and
y = xy[1] whose function is to reference xy at positions 0 and
1, respectively. Next, the command plt.plot(x, y, ...) defines an
f-quib whose function is to perform plt.plot on the values of
x and y. Similarly, y + 30 is a function quib that adds 30
to the value of y, and then plt.text(...) is a function quib
that calls the Matplotlib function plt.text with the values of its
quib arguments.
Upstream changes automatically propagate to affect the value of downstream quibs
All of these quibs are created declaratively: they are functional
objects whose value changes upon upstream changes. As seen in the video
above, we can probe the value of any quib using the get_value
method. When we make an assignment to the upstream i-quib xy, say
assigning xy[0] = 100, we change the value of xy, which in turn
changes the value of x, which in turn changes the plot and the text.
Interaction with the graphics is inverse-propagated, leading to changes in upstream quibs
The relation above can also go backward. Quibbler allows dragging the
plotted graphics while translating such user interactions with the
graphics into assignments to the corresponding quib arguments of the
plt.plot function. Such assignments into the arguments of the
plot function are then inverse-propagated further upstream,
ultimately actualized as changes to upstream quibs (typically reaching
upstream i-quibs; see Assignments). In our case dragging the
marker is initially translated into assignments to the x and y
quibs. Since x and y are function quibs, these assignments are
further inverse-propagated upstream to the i-quib xy where they are
actualized. The resulting change in xy then percolates downstream to
affect the plotted marker as well as text position and the text label.
Building interactive data analysis apps
The above principles can be used to easily build powerful bi-directional relationships between data, parameters and graphics.
Continuing towards building our image-extracting app, let us extend the
coordinate-choosing code above, allowing the interactive specification
of a square area around this chosen point. We will define and plot our
square area as a box extending length d from our defined x-y
coordinates:
# Define and plot a square around the xy-point
d = iquib(120)
plt.plot(d * np.array([ -1,  1,  1, -1, -1]) + x,
         d * np.array([ -1, -1,  1,  1, -1]) + y,
         color='Orange');
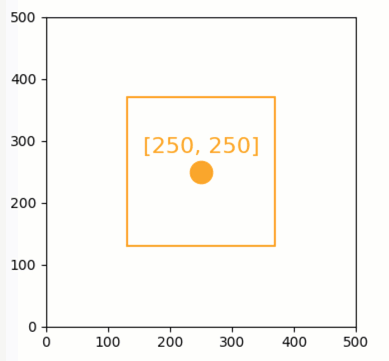
As we can see, this plot too is automatically interactive. Dragging any
of the corners of the square is inverted into an assignment to the iquib
d which then refreshes all other corners of the plotted square (to
further understand how Quibbler chooses to invert these dragging
actions into changes in d rather than in x or y, see
Assignments, or the
Dragging whole object versus individual points example).
Connecting quibs with widgets
Quibs can also readily connect with standard Matplotlib widgets, easily enabling interactive data exploration. Here again, unlike in standard programming, using quibs in widgets automatically creates an interactive behavior without requiring us to specifically implement a callback function for each widget.
As an example, let’s add a slider controlling the size of our square box.
As the box is extending from -d to d, we will define its size
by:
box_size = 2 * d + 1
To connect widgets with quibs, we simply use standard Matplotlib
widgets, while specifying a quib as the value of the widget. In our
case, we will create a slider with its value set to the function quib
box_size:
from matplotlib.widgets import Slider
main_ax = plt.gca()
slider_ax = plt.axes([0.3, 0.05, 0.5, 0.04])
Slider(ax=slider_ax, label='box_size', valmin=1, valmax=500,
       valinit=box_size);
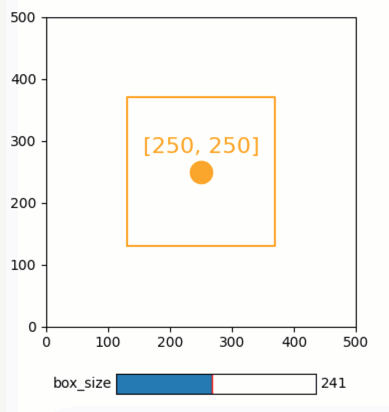
As we can see, the created widget is bi-directionally linked with the
data. First, when we drag the square corners, d changes and the
slider automatically moves. Conversely, when we drag the slider, these
interactions are inverted into assignments to box_size and, since
box_size is a function quib, the change further propagates to affect
d, thereby refreshing the plotted square. Note that as d is
defined as an integer, box_size, which is defined as 2 * d + 1
is, by definition, an odd number. Indeed, as we drag the slider,
Quibbler restricts the dragging to odd numbers (to understand more on
dragging between restricted values, see
Dragging graphics between fixed points).
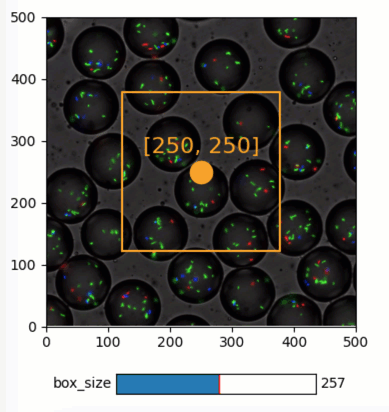
Loading data from files
Function quibs can also implement functions that read data from files. Simply setting the file name as a quib, a standard file-accessing function will create a function quib that loads the file.
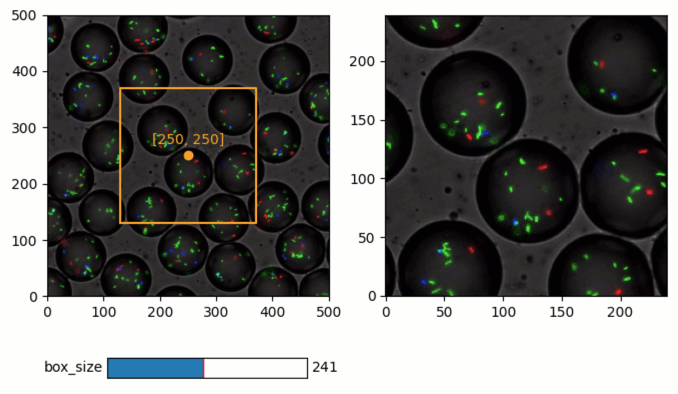
In our example, we will load and plot the source image that we want to cut based on our defined square. Let’s look at an example of a microscopy image of fluorescently-labeled bacteria growing inside small micro-droplets (credit: Einat Tamar, Kishony lab, Technion):
# Load and plot source image
filename = iquib('bacteria_in_droplets.tif')
img = plt.imread(filename)
main_ax.imshow(img);
Concluding our image cutting app
We are now ready to conclude our app. We will use the quibs x, y
and d, defined above, to extract a square region from our source
image. To do this, we will simply define
img_cut = img[y-d:y+d, x-d:x+d, :], which creates a function quib
that performs the slicing operation. A plot of this sub-image will
thereby automatically update when we move our center x-y point, or
change the width of our defined square.
Here thereby is our entire code:
# Prepare figure
plt.figure(figsize=(8, 5))
plt.subplot(1, 2, 1)
plt.axis('square')
plt.axis([0, 500, 0, 500]);

# Plot a "live" marker and text at defined xy-coordinates:
xy = iquib([250, 250])
x, y = xy
plt.plot(x, y, 'o', color='Orange')
plt.text(x, y + 20, xy, color='Orange', ha='center');

# Define and plot a square around the xy-point
d = iquib(120)
plt.plot(d * np.array([ -1,  1,  1, -1, -1]) + x,
         d * np.array([ -1, -1,  1,  1, -1]) + y,
         color='Orange');

# Define the box-size slider:
box_size = 2 * d + 1
slider_ax = plt.axes([0.2, 0.05, 0.25, 0.04])
Slider(ax=slider_ax, label='box_size', valmin=1, valmax=500,
       valinit=box_size);

# Load and plot source image
filename = iquib('bacteria_in_droplets.tif')
img = plt.imread(filename)
plt.subplot(1, 2, 1).imshow(img);

# Cut and plot the sub-image:
img_cut = img[y-d:y+d, x-d:x+d, :]
plt.subplot(1, 2, 2).imshow(img_cut, origin='lower');
Conclusions
As we have seen, Quibbler provides a fast, easy and intuitive way to analyze data in an inherently interactive way. Notably, such interactive analysis appears naturally in Quibbler without us needing to worry about the traditional, and often tedious, programming of specific callback functions for each interactive behavior. Instead, we can set our mind on the analysis from a data-oriented forward-looking standpoint, and let Quibbler deal with any asynchronous graphics or widget events.
Other major features of Quibbler
Beyond Interactivity, other important capabilities of Quibbler, not demonstrated above, include:
1. Efficiency. Upon changes to parameters, Quibbler tracks and identifies which specific downstream data items, or even specific elements thereof, are affected and only recalculates these affected items. See Diverged evaluation.
2. Traceability Quibbler allows us to easily probe which specific
inputs affect a downstream result, and vise versa, which downstream
results are affected by a given focal parameter. See ancestors,
descendants.
3. Overriding. Function quibs can be overridden, streamlining exception specifications to default behaviors. See Overriding default functionality.
4. Transparency. Inputs, as well as exceptions and overrides, are saved in simple human-readable files. See Project save/load and the Quibbler Jupyter lab extension. See Using Quibbler with Jupyter lab.